A CT or MRI scan can show a lot of detail, but it still appears on a flat screen. For straightforward cases, that may be enough. For complex anatomy, it is often harder.
A surgeon may need to understand a bone defect from several angles. A device engineer may need to check how a prototype sits against patient-specific anatomy. A medical student may understand a structure faster by holding it than by scrolling through image slices. A patient may feel more confident when the doctor can point to a real model and explain what is happening.
That is where medical 3D printing becomes useful.
It does not replace medical imaging. It makes imaging easier to understand. By turning scan data or CAD geometry into physical models, 3D printing gives healthcare teams a practical way to study anatomy, test device concepts, explain procedures, and improve early product decisions.
For companies developing medical products, custom 3D printing services can also reduce the time between an idea, a prototype, and a testable part.
What Are 3D Printed Anatomical Models?
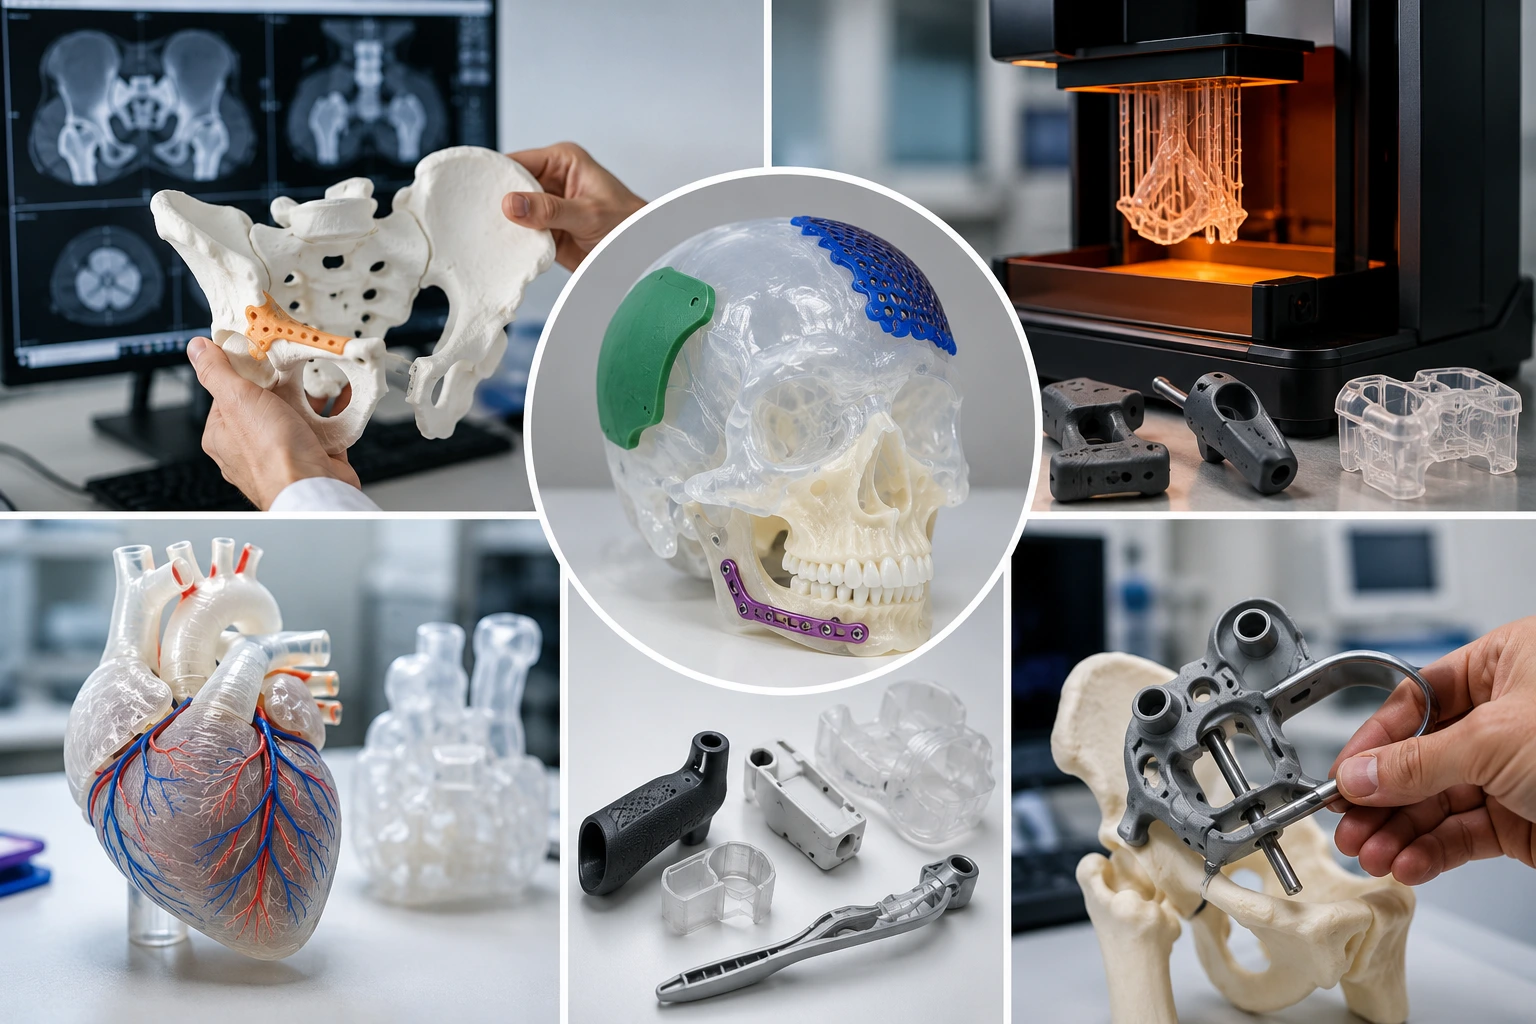
3D printed anatomical models are physical models made from medical imaging data, 3D CAD files, or reconstructed digital geometry. They may represent bone, teeth, blood vessels, organs, tumors, soft tissue, or a specific area where a device needs to fit.
The process usually starts with CT or MRI data. The target structure is segmented in medical imaging software, converted into a printable 3D model, repaired if needed, and then produced with a suitable 3D printing process.
In real projects, the model does not always need to show every tiny detail. It needs to show the right details. A surgical planning model may need accurate landmarks and access areas. A training model may need clear color separation. A device development model may need repeatable fit and enough durability for handling.
| Model Type | Common Use | Practical Requirement |
|---|---|---|
| Bone model | Orthopedic planning, implant fit, education | Good rigidity and visible geometry |
| Dental / jaw model | Implant planning, guide development, teaching | Fine detail and stable dimensions |
| Vascular model | Pathway visualization, device access study | Transparency or color separation |
| Organ model | Training, patient communication, surgical review | Clear anatomy and durable handling |
| Tumor model | Case explanation, planning discussion | Color contrast and accurate location |
| Device fit model | Prototype validation against anatomy | Functional geometry and tolerance control |
The best anatomical models are not just “nice-looking prints.” They answer a specific medical or engineering question.
Where Anatomical Models Help Most
Medical 3D printing is especially valuable when anatomy is difficult to visualize from images alone.
For example, a complex fracture may be easier to discuss when the surgical team can rotate a printed bone model in their hands. A cardiovascular model may help show a catheter path. A craniofacial model may help explain reconstruction planning. For medical device companies, patient-specific or anatomy-based models can reveal fit problems before expensive testing begins.
Common use cases include:
| Application | How the Model Helps |
| Surgical planning | Helps teams review anatomy before a procedure |
| Medical education | Gives students a physical reference for complex structures |
| Patient communication | Makes treatment discussions easier to understand |
| Device development | Tests product fit against realistic anatomical geometry |
| Procedure training | Provides repeatable models for practice and demonstration |
| Implant evaluation | Checks size, placement, and contact areas before further development |
| Engineering review | Helps designers see clearance, access, and assembly issues |
A physical model can slow down the conversation in a good way. Instead of everyone interpreting the same image differently, the team can look at the same object and discuss the same features.
Medical Device Prototypes: Different Goal, Different Design Logic
An anatomical model is mainly about visualization. A medical device prototype is about whether a product idea can work.
That may be a surgical instrument handle, a diagnostic device housing, a wearable sensor enclosure, a dental guide, a lab cartridge, an orthopedic trial part, or a test fixture. These parts may not need to be clinically approved final-use products, but they need to support real development decisions.
A prototype may need to answer questions like:
Will the surgeon hold it comfortably?
Will the housing close correctly?
Will the clip survive repeated assembly?
Will the device fit around the anatomical region?
Will the screw bosses crack?
Will the catheter path or guide channel make sense?
Will the design need CNC machining or molding later?
This is why rapid prototyping is so useful in medical product development. Teams can test an early design, adjust it, print again, and compare several versions before moving to more expensive manufacturing steps.
Choosing the Right 3D Printing Process
Not every medical model should be printed with the same technology. A smooth anatomical display model and a strong functional device prototype have different needs.
SLA, SLS, MJF, FDM, MJP, and metal 3D printing all have a place. The right choice depends on surface detail, strength, transparency, handling, tolerance, and quantity.
| Process | Best For | Strength | Surface Detail | Notes |
| SLA | Smooth anatomical models, dental models, visual prototypes | Medium | Excellent | Good for fine detail and clear/rigid resins |
| SLS | Durable nylon prototypes, complex shapes, handling models | High | Good | No support structures on part surfaces |
| MJF | Functional nylon prototypes and small-batch parts | High | Good | Good repeatability for PA12 parts |
| FDM | Large concept models, quick fit checks | Medium | Moderate | Cost-effective, but visible layer lines |
| MJP / PolyJet-style printing | High-detail visual models, color or multi-material concepts | Medium | Excellent | Useful when realism or color separation matters |
| DMLS / SLM | Metal prototypes, complex metal medical components | Very high | Good after finishing | Higher cost, used for demanding parts |
For a smooth anatomical model, SLA 3D printing is often a good starting point. For functional nylon prototypes that need repeated handling, SLS 3D printing or MJF 3D printing may be more practical.
The decision should not start with “Which process is popular?” It should start with “What does this model need to prove?”
Materials: Visual Clarity or Functional Strength?
Material selection is where many medical 3D printing projects succeed or fail.
A clear resin model may be perfect for showing internal geometry, but it may not survive repeated mechanical testing. A nylon PA12 prototype may be strong enough for handling and fit testing, but it will not look like a polished presentation model without finishing. A flexible material may help simulate soft contact, but it may not hold fine detail as well as rigid resin.
| Material Type | Best Use | Strength | Visual Quality | Limitation |
| Rigid SLA resin | Bone models, dental models, visual prototypes | Medium | High | Can be more brittle than nylon |
| Clear resin | Vascular models, transparent shells, internal visualization | Medium | High after polishing | Requires careful post-processing |
| PA12 nylon | Functional prototypes, device housings, handling models | High | Medium | Slightly grainy raw surface |
| TPU / flexible material | Soft-touch models, flexible device parts | Medium | Medium | Lower fine-detail sharpness |
| Metal alloy | Advanced functional prototypes | Very high | Medium to high after finishing | Higher cost and longer finishing route |
For 3D printing service for medical prototypes, the safest approach is to define the model’s purpose first. A model for explanation, a model for training, and a model for device testing may all use different materials.
Accuracy Starts Before Printing
A medical model is only as reliable as the data and preparation behind it.
If scan quality is poor, the printed part cannot magically become accurate. If segmentation is rushed, important structures may be missing or distorted. If wall thickness is too thin, the model may break during cleaning. If post-processing is aggressive, small features may be softened.
Accuracy is affected by:
| Factor | Why It Matters |
| Scan quality | Defines the original anatomical detail |
| Segmentation | Determines which structures are included |
| File repair | Prevents holes, broken surfaces, and print errors |
| Print process | Controls resolution, tolerance, and surface quality |
| Material shrinkage | Can affect final dimensions |
| Orientation | Affects surface finish and support marks |
| Post-processing | May change size, clarity, or fine features |
| Inspection | Confirms critical areas before use |
For models used only for visual communication, the tolerance requirement may be moderate. For a medical device prototype that needs to mate with another component, critical features should be marked clearly on a 2D drawing.
If a printed part needs tighter holes, flat sealing faces, or precision interfaces, it may need secondary machining. This is where precision CNC machining can support the next stage after 3D printing.
Design Tips for Anatomical Models
A good anatomical model should be easy to understand and strong enough to handle.
This sounds simple, but it affects many design choices. Very thin bone walls may need local thickening. A vascular model may need a transparent shell. A tumor region may need color separation. A large model may need to be split into parts with alignment pins. A teaching model may need simplified geometry so the important structures stand out.
Useful design choices include:
| Design Choice | Why It Helps |
| Add minimum wall thickness | Prevents fragile regions from breaking |
| Use cutaway sections | Shows internal anatomy clearly |
| Add color separation | Highlights tumor, vessel, bone, or implant areas |
| Use transparent materials | Helps visualize internal pathways |
| Split large models | Improves printability and handling |
| Add pins or magnets | Makes assembly easier |
| Smooth contact surfaces | Improves handling and presentation |
The goal is not to print the most complicated model possible. The goal is to print a model that helps people make better decisions.
Design Tips for Medical Device Prototypes
Medical prototypes need a more engineering-focused design review. Even if the part is only for early testing, it should not break too easily or give misleading feedback.
For rapid prototyping for medical devices, pay attention to:
| Prototype Feature | Design Recommendation |
| Device housing | Use realistic wall thickness and assembly clearance |
| Screw boss | Add fillets and enough local wall thickness |
| Snap-fit | Use a tough material and rounded root geometry |
| Handle or grip | Check ergonomics and surface texture |
| Lab cartridge | Confirm channel geometry and mating features |
| Wearable part | Check comfort, edge radius, and component clearance |
| Test fixture | Use durable material and enough stiffness |
| Critical hole | Consider drilling, reaming, or CNC machining after printing |
A common mistake is using a visual prototype to judge functional performance. A part can look excellent and still be too brittle for assembly testing. If the project needs both appearance and function, it may be better to print two versions: one for visual review and one for functional testing.
From Scan or CAD File to Finished Model
The workflow is usually more involved than “send file and print.”
A typical project may follow this path:
- Collect CT, MRI, or CAD data.
- Segment the target anatomy or design features.
- Convert the data into a printable 3D model.
- Repair surfaces and remove errors.
- Adjust wall thickness, openings, or split lines.
- Choose material and print process.
- Print the model or prototype.
- Remove supports, clean, cure, dye, paint, or polish.
- Inspect critical dimensions or visual features.
- Review the model with the medical or engineering team.
For a simple prototype, this may be fast. For a complex anatomical model with transparency, color, or multiple parts, planning matters more.
A good supplier should ask how the model will be used before choosing the process.
When 3D Printing Should Be Combined with CNC Machining
3D printing is excellent for complex geometry. CNC machining is better for certain precision features.
In medical product development, the two are often used together. A team may print a complex anatomical model for review, then CNC machine a device prototype for final-material testing. Or a 3D printed part may be machined afterward to improve holes, mating surfaces, or flatness.
| Development Stage | Better Manufacturing Choice | Reason |
| Concept visualization | SLA / FDM | Fast and cost-effective |
| Anatomical planning model | SLA / MJP / SLS | Good shape and detail |
| Functional plastic prototype | SLS / MJF | Stronger for repeated handling |
| Precision engineering prototype | CNC machining | Better tolerance and material behavior |
| Small-batch validation parts | Low-volume manufacturing | More repeatable before production |
| Final production planning | CNC, injection molding, or hybrid process | Depends on volume and material |
For teams moving from prototype to pilot production, low-volume manufacturing can be useful because medical product development often needs small batches before full production approval.
Post-Processing Can Change the Result
Post-processing is not just cosmetic. It can affect fit, surface feel, transparency, and durability.
Support removal may leave marks. Sanding may soften edges. Painting may hide small details. Polishing may improve clear models but take extra time. Dyeing can make nylon parts look more consistent. Insert installation can make a prototype stronger for repeated assembly.
| Post-Processing Method | Best Use |
| Support removal | Cleaning SLA or support-based parts |
| UV curing | Stabilizing resin prints |
| Sanding | Improving visible surfaces |
| Painting | Highlighting anatomy or creating product-like appearance |
| Dyeing | Coloring SLS or MJF nylon parts |
| Polishing | Improving transparent or glossy surfaces |
| Assembly | Joining large anatomical models |
| Insert installation | Strengthening repeated-use prototype threads |
If the model is for a presentation, post-processing may be essential. If the part is for functional testing, avoid finishing steps that change critical dimensions unless they are planned from the beginning.
Boona’s surface finishing services are useful when a raw printed part needs a better surface, color, texture, or presentation quality.
Quality Control and Responsible Use
Medical projects require clear expectations.
A 3D printed model for education is not the same as a patient-contact device. A prototype used for internal fit testing is not the same as a clinically approved product. When a part may be used in a medical workflow, its intended use must be defined carefully.
Quality review should include:
| Check | Why It Matters |
| Visual inspection | Confirms missing features, defects, or surface issues |
| Dimensional check | Verifies critical sizes and mating areas |
| Fit test | Confirms assembly or device interaction |
| CAD comparison | Checks whether the printed model follows the file |
| Material record | Tracks what material was used |
| Revision record | Avoids confusion between prototype versions |
| Use-case review | Confirms whether the model is for display, testing, or regulated use |
For regulated or patient-contact applications, the medical device team must handle validation, documentation, compliance, and clinical suitability. A manufacturing supplier can support prototyping and production, but intended use and regulatory responsibility must be clearly managed by the product owner.
For prototype projects that require documentation and inspection, quality control should be part of the plan from the start.
Practical Example: Developing a Surgical Tool Prototype
Imagine a team developing a new surgical guide or instrument. The first step may be a 3D printed anatomical model based on bone geometry. The team uses it to study access, angles, and fit.
Then they print a first device concept. It may be SLA if the team wants a clean visual model. It may be SLS or MJF if the guide needs repeated handling. If the final version requires tight holes or metal strength, the next step may be CNC machining.
A realistic development path could look like this:
| Step | Model or Prototype | Purpose |
| 1 | Printed anatomical model | Understand patient-specific or reference anatomy |
| 2 | Visual device prototype | Review shape and user handling |
| 3 | Functional nylon prototype | Test fit, access, and assembly |
| 4 | CNC-machined engineering sample | Validate tighter tolerances and stronger material |
| 5 | Low-volume samples | Prepare for repeat testing or customer review |
This staged workflow is often more reliable than expecting one print to answer every question.
Final Thoughts
Medical 3D printing makes patient anatomy, product ideas, and early design risks easier to see. It helps doctors, engineers, and medical device teams work from a shared physical model instead of only interpreting images or CAD files.
For anatomical models, the value is visualization and communication. For medical prototypes, the value is faster iteration and earlier testing. The strongest results come when the team chooses the right process, material, tolerance plan, and post-processing method for the model’s actual use.
SLA works well for smooth, detailed visual models. SLS and MJF are better when the part must survive handling or functional testing. CNC machining and low-volume manufacturing become important when the design needs tighter tolerances, final-material behavior, or more repeatable samples.
For medical product developers, 3D printing is not just a way to make a part quickly. It is a way to make better decisions earlier.
FAQs
What is medical 3D printing used for?
Medical 3D printing is used to create anatomical models, surgical planning models, training tools, medical device prototypes, dental models, and functional test parts. It helps doctors, engineers, and product teams turn CT, MRI, or CAD data into physical models that are easier to review, test, and explain.
How are 3D printed anatomical models made?
Most 3D printed anatomical models start with CT or MRI scan data. The target anatomy is segmented in medical software, converted into a 3D file, repaired if needed, and then printed using a suitable process such as SLA, SLS, MJF, or other additive manufacturing methods. The final model may also be cleaned, cured, painted, polished, or assembled.
Which 3D printing process is best for anatomical models?
It depends on the model’s purpose. SLA is often used for smooth, detailed anatomical models and visual prototypes. SLS and MJF are better for stronger nylon parts that need repeated handling or functional testing. FDM can be useful for large concept models, while multi-material or clear resin options may be better for visualizing vessels, organs, or internal structures.
Can 3D printing be used for medical device prototypes?
Yes. Medical device prototypes are one of the most practical uses of 3D printing. Teams can test housings, handles, surgical tools, wearable devices, lab cartridges, fixtures, and fit-check models before moving to CNC machining, injection molding, or low-volume production. This helps reduce redesigns and speed up product development.
Are 3D printed medical models accurate?
They can be highly useful, but accuracy depends on scan quality, segmentation, printer resolution, material behavior, orientation, and post-processing. A visual education model may not need the same accuracy as a device fit model. For critical holes, mating surfaces, or tight tolerances, secondary CNC machining or additional inspection may be needed.
What should I consider before ordering a medical 3D printed model or prototype?
Before ordering, define the model’s purpose clearly. Is it for surgical planning, education, patient communication, device fit testing, or functional validation? Then consider material, printing process, wall thickness, surface finish, tolerance requirements, post-processing, and whether the part needs inspection or later CNC machining. Clear requirements help the supplier choose the right manufacturing approach.